
This guide provides step by step instructions for the configuration of Bandwidth Control on a Siretta router. These instructions may be used with any Siretta router. This document explains how to set bandwidth limits for specific devices attached to the router in order to control overall data usage on the cellular network.
The following products were used to create this document: –
• QUARTZ-W22-UMTS (EU) + ACCECSORIES
• CAMERA DCS-932L
• PC for configuration both Camera and router
• Data enabled sim card
Steps to configure bandwidth control:
1. Insert data enabled sim card into the router and configure it as explained in the Router Quick Start guide (separate document)
2. Once the router is connected to the cellular DATA networked ready to transfer data, it will have been assigned an IP address by the cellular network (10.136.164.140 in this example).
3. Attach the camera to be bandwidth controlled (DCS-932L) to one LAN port of the router.
4. Navigate to Device List on the router GUI and you will see the listed devices as per the screenshot below which indicates MAC and local IP addresses of the devices attached to the router.
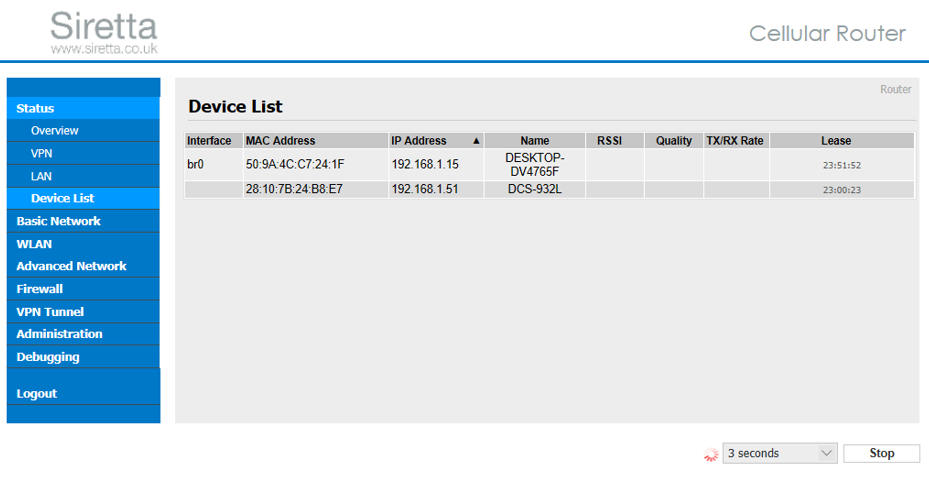
Note: Mac address of the camera is 28:10:7B:24: B8:E7
5. Navigate to advanced network tab of the router GUI.
6. Navigate to the Bandwidth Control sub-tab.
7. Check the “Enable Control” box.
8. Enter the MAC address of the device you wish to bandwidth control. In this example it is the camera with MAC address of 28:10:7B:24: B8:E.
9. Enter values for DL Rate, DL Ceil, UL Rate, UL Ceil and Priority.
10. Click Add, you will be presented with the screenshot below.
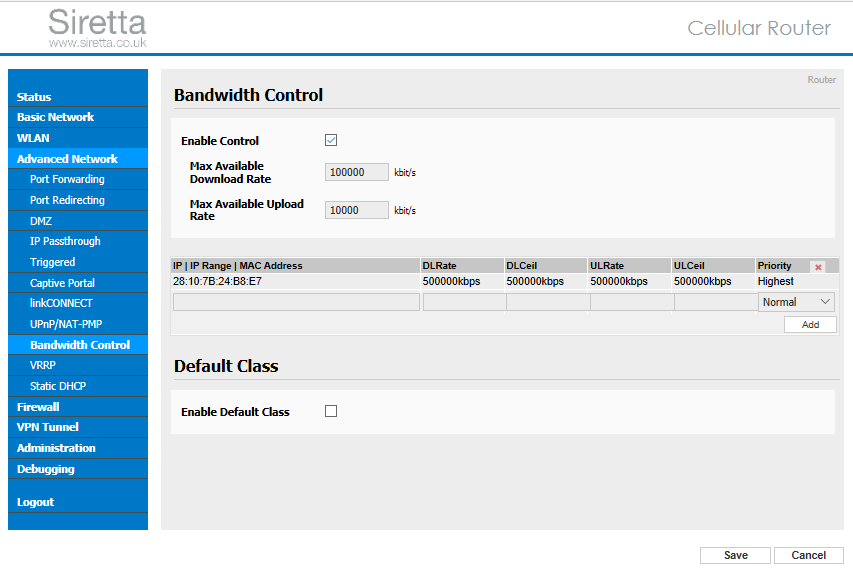
11. Table below explains parameters used in configuring bandwidth control.
| Max Available Download Rate | Limit all the devices which are connected to the router |
| Max Available Upload Rate | Limit all the devices which are connected to the router |
| IP/ IP Range/MAC Address | Limit a specific user rata by IP/IP Range/ MAC Address |
| DL Rate | Download rate |
| DL ceil | Max download rate |
| UL Rate | Upload rate |
| UL ceil | Max upload rate |
| Priority | The priority of a specific user |
| Default Class | Limit the other devices which are not limited in the MAC/ IP list. |
DL rate range between 1 and 999999
DL Ceil range between 1 and 999999
UL rate range between 1 and 999999
UL Ceil range between 1 and 999999
Select priority from: –
• Lowest
• Low
• Normal
• High
• Or Highest from the drop-down menu.12. Click save and wait for the service to restart.
Multiple devices can be added using the similar way as described in this document.
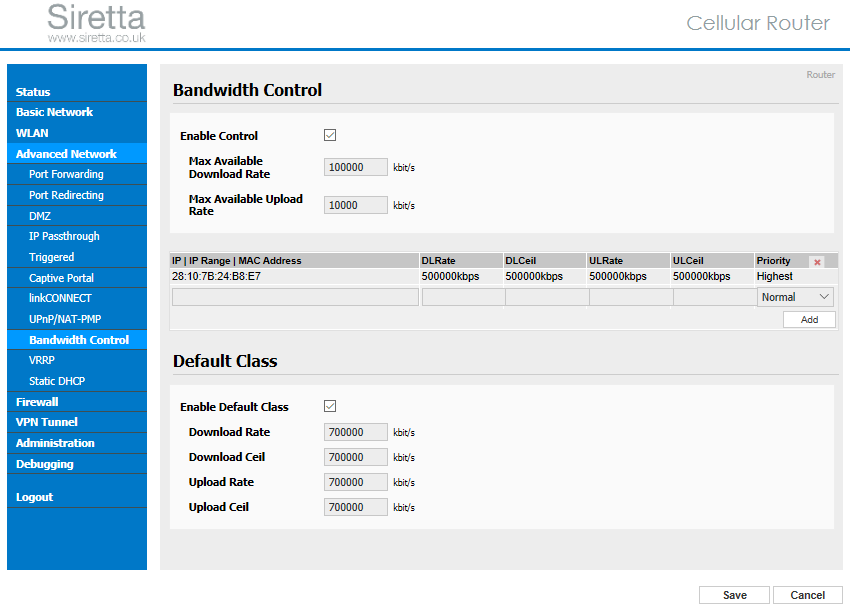
17. Now the setting is complete with Default Class Enabled.
