
Introduction
Scanning cellular networks is an important part of your system design and can optimise your solution but what happens when things don’t go to plan? When networks are discovered which are not expected or networks can’t be found in a known good location?
In this application note, we explain how to enable SNYPER debug logging to capture low level data from the SNYPER to allow Siretta engineers to investigate further.
What SNYPER debug log does?
The SNYPER debug log records internal events from the radio interface and operating system status messages generated by the software during its operation. These elements combine to provide a detailed breakdown of what is happening ‘under-the-bonnet’. With this detailed information Siretta engineers can evaluate the survey performed in detail and diagnose and troubleshoot any anomalies that are discovered.
How to turn SNYPER debug logging on?
1) Power on your SNYPER and wait for the menu system to appear
2) Navigate to ‘Setup’ and select

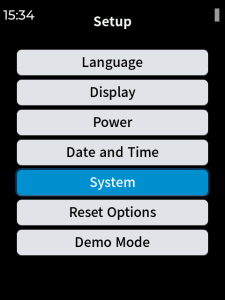
3) Navigate to ‘System’ and select
4) Activate the tick on ‘Debug log enabled’ to turn on logging

How to use SNYPER debug logging?
1) Navigate to ‘Survey’ and choose your survey options
2) Perform the survey in the location where an anomaly has been seen previously
3) Wait for the survey to complete
How to send the SNYPER debug log to Siretta?
1) Navigate to the ‘USB HDD Enable’ and select
2) Follow the on screen instructions
3) Navigate to the SNYPER HDD in your file manager

4) Locate the ‘debug-log.bin’ file and email it to your Siretta contact.
5) Alternatively send an email to ‘[email protected]’ explaining the anomaly and attach the log file
6) Siretta engineering will try and get back to you within 48 hours