
Applicable Products
| Part number | Description |
| QUARTZ-22-LTE (EU) | Dual Port Dual SIM LTE Router (EU) |
| QUARTZ-COMPACT-11-LTE (EU) | Single Port Compact LTE Router (EU) |
| QUARTZ-COMPACT-G11-LTE (EU) | Single Port Compact LTE Router (EU) with GPS |
| QUARTZ-GOLD-W21-LTE4 (EU) | Gigabit Ethernet RS232 Industrial Router with dual WiFi |
| QUARTZ-GOLD-W21 (485) – LTE4 (EU) | Gigabit Ethernet RS485 Industrial Router with dual WiFi |
| QUARTZ-GOLD-21-5G (GL) | Dual Port Gigabit Ethernet 5G NR Router (GL) |
| QUARTZ-GOLD-W21-5G (EU) | Dual Port Gigabit Ethernet 5G NR Router (EU) |
| QUARTZ-GOLD-W21-5G (GL) | Gigabit Ethernet Industrial Router with dual Wi-Fi |
| QUARTZ-GW22-LTE (EU) | Dual Port Dual SIM LTE Router (EU) with GPS |
| QUARTZ-LITE-11-LTE (EU) | Dual Port Small Footprint LTE Router (EU) |
| QUARTZ-LITE-21-LTE (EU) | Dual Port Small Footprint LTE Router (EU) |
| QUARTZ-LITE-G21-LTE (EU) | Dual Port Small Footprint LTE Router (EU) with GPS |
| QUARTZ-LITE-GW21-LTE (EU) | Dual Port Small Footprint LTE Router (EU) with GPS |
| QUARTZ-LITE-W21-LTE (EU) | Dual Port Small Footprint LTE Router (EU) |
| QUARTZ-ONYX-GW42-5G (GL) | Quad Port Gigabit Ethernet 5G NR Router (GL) with GPS |
| QUARTZ-ONYX-W42-5G (GL) | Quad Port Gigabit Ethernet 5G NR Router (GL) |
| QUARTZ-W22-LTE (EU) | Dual Port Dual SIM LTE Router (EU) |
Objective
Quartz Routers series use a combination of Router and cellular module firmware to function. Router firmware can be updated by following the application note “How to upgrade a Siretta Router Firmware Application Note”
Updating Router Module Firmware has been a complex one that involves opening of Router casing, removing PCB assembly, detaching the Module, plugging the Module into a USB adapter to update firmware using a tool called QFLASH. A lengthy procedure requiring Siretta Technical support.
This application note allows users to remotely update the Module inside Siretta Router Quartz series using efficient and non-invasive procedure without disassembling the unit.
For remote AT over IP access, the sim card inside Siretta Router must be a fixed public IP address or private fixed IP address with the VPN connection and Router must be configured locally first to accept remote access.
More information about IP addresses can be found from the following application note Siretta Products IP Addresses Explained Application Note
Solution
DFOTA – Stands for Delta Firmware Update Over-The-Air. DFOTA allows users to update Router Module firmware using cellular network. Router is set to AT over IP mode where AT command AT+QFOTADL is issued to initiate the update process and point to a location where delta firmware is stored.
Delta firmware file can be either stored in a remote HTTPS/HTTP/ FTP server or in a local file system. This application note covers the procedure where delta firmware file is stored in a local file system.
Requirements
Siretta Quartz Series Router (for this application QUARTZ-GOLD-11-LTE (EU) was used)
- Windows 11 Laptop with Tera Term Version 4.96 or above (Tera Term can be downloaded from the following link – Tera Term Link ).
- Location where Delta Firmware file is stored.
- Fixed Public IP address /Fixed Private IP address sim with the OpenVPN.
- For this guide Private Fixed IP address of 10.188.232.13 with the OpenVPN client was used.
- OpenVPN client setting was provided by a sim provider and installed to Windows 11 Laptop.
Demonstration of Solution
Follow Router Quick Start Guide for initial Router settings.
- Wait for the Router to connect to the cellular network.
- Confirm that Router has received IP addresses (See below).
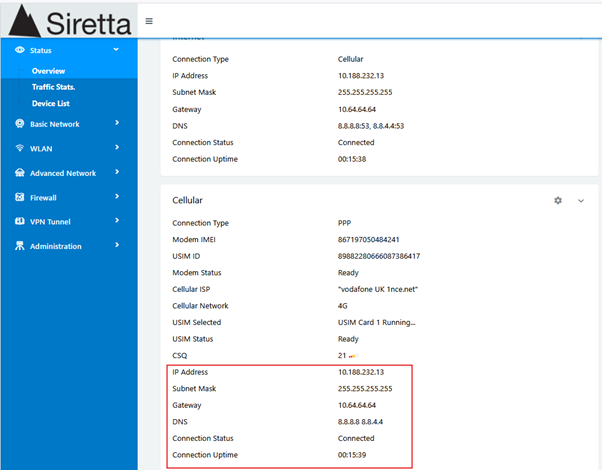
Note 1:
• IP address of 10.188.232.13 shown above, is the IP address that will be used to remotely access AT over IP using OpenVPN client.
• If sim card with fixed public IP address been used, then fixed public IP address will be used for AT over IP without needing to use OpenVPN client.
4. Open AT Command over Internet Protocol Router Guide
5. Follow steps 1 to 22 of the AT Command over Internet Protocol Router Guide.
Note 2:
• Local Router IP address in AT Command over Internet Protocol Router Guide is 172.168.1.1 which is different from the local Router IP address used in this guide 192.168.1.1.
• In step 12 of AT command over Internet Protocol Guide replace 172.168.1.1 with 10.188.232.13 and continue to step 22 of the guide.
6. Navigate to the AT over IP page from Router GUI to confirm that all settings are saved as shown below.
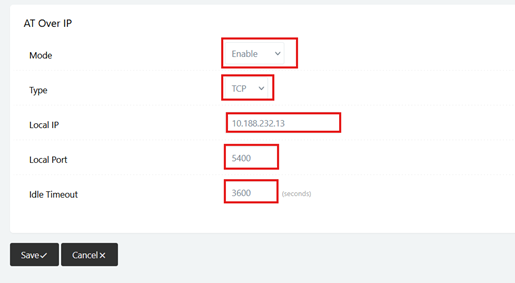
7. You have now set AT over IP.
Enabling Remote Access
8. Navigate to Administration Tab in Router GUI.
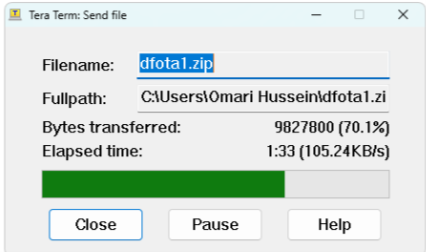
9. Select Admin Access Tab.
10. Enable Remote Access (HTTP).
11. Check “Allow Telnet Remote Access” box (see below page).
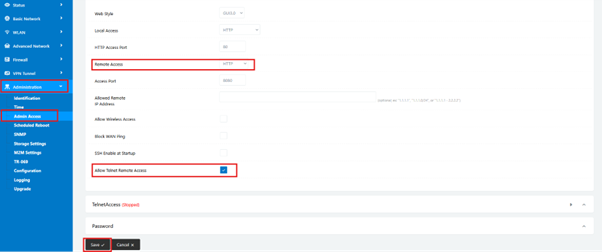
12. Click Save.
13. You will see a message displaying “The settings changed, some settings will take effect after the Router reboots”. Reboot Now
14. Click Reboot Now.
15. Wait for the Router to complete reboot cycle.

16. Navigate to Firewall tab from Router GUI.
17. Select IP/URL Filtering.
18. Allow any traffic to 10.188.232.13 and Port 5400 (see below).

19. Click OK.
20. You will see settings as below.

21. Click Save tab.
22. Wait for setting to be saved.
23. You have now configured Router to accept remote connection.
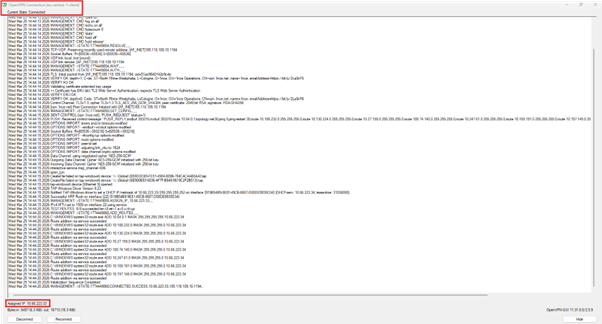
24. Confirm that laptop is connected to the OpenVPN Server (See below).
25. Below is the OpenVPN status page, showing laptop is connected to the server and assigned IP.
26. Use laptop connected to the OpenVPN to launch Tera Term Window (See below).
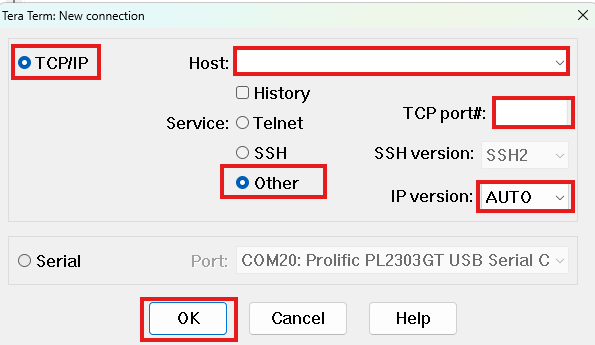
27. Select “TCP/IP “radio button.
28. In host field type IP address of “10.188.232.13” (Private IP address of the sim card inside Router).
29. Select “Other” in a service field.
30. Enter port number of “5400” in TCP port#: field
31. Select “IPV4” from IP version drop down menu.
32. Once all details are filled, settings will look like one below.
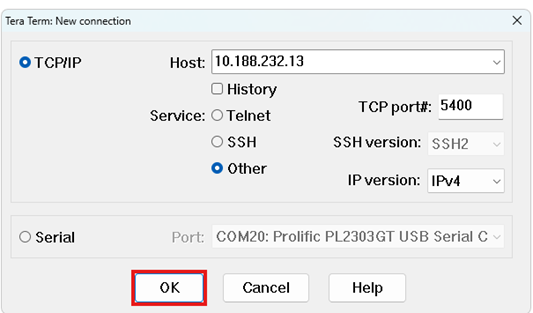
33. Click OK.
34. You will be presented with Tera Term window below.
| 10.188.232.13 – Tera Term VT |
| File Edit Setup Control Window Help |
35. You have now established connection with the cellular module inside the Router using fixed private IP address and VPN.
36. Issue the following AT commands to query modem before DFOTA process.
37. Issue AT– to Check AT communication.
| 10.188.232.13 – Tera Term VT |
| File Edit Setup Control Window Help |
|
AT
OK |
38. Receive OK if there is communication between PC and Module inside Router else contact [email protected]
39. Issue AT+QGMR to receive full current firmware version.
| 10.188.232.13 – Tera Term VT |
| File Edit Setup Control Window Help |
|
AT+QGMR
EC25EUXGAR08A15M1G_20.200.20.200
OK |
40. Full current firmware version is EC25EUXGAR08A15M1G_20.200.20.200
Delta Firmware location
41. From Laptop / your PC file explorer Locate path for Delta Firmware package location.
42. For this guide the firmware file is located at C:\Users\Omari Hussein\Downloads\ dfota1.zip.
43. Issue the following at command AT+QFUPL=”dfota1.zip”,14026912,500 to prepare module to accept firmware file with size of 14026912 bytes and timeout of 500.
44. Receive “CONNECT” when successful.
| 10.188.232.13 – Tera Term VT |
| File Edit Setup Control Window Help |
|
AT+QFUPL=” dfota1.zip”,14026912,500
CONNECT |
45. Click file.
46. Select Send File.
47. You will receive Tera Term: Send File (See below).
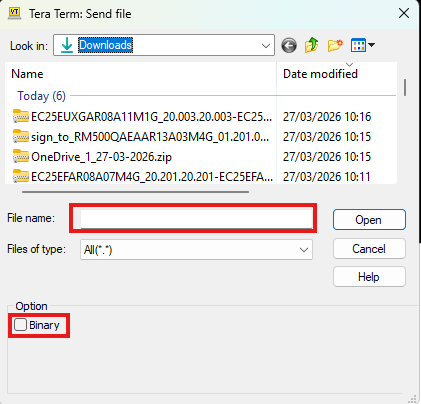
48. Search firmware file name “dfota1.zip” and select it.
49. Select “Binary” check box.
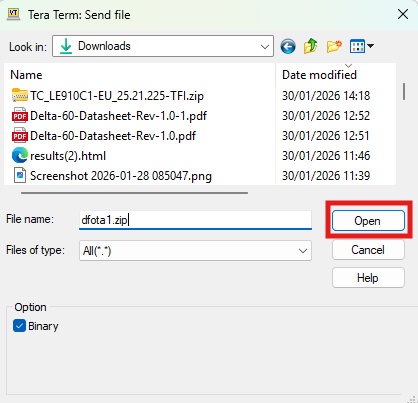
50. Click open tab.
51. File will be sent to the module with displayed progress bar as seen below.
52. Once file transfer is complete, you will receive confirmation as below.
| 10.188.232.13 – Tera Term VT |
| File Edit Setup Control Window Help |
|
+QFUPL: 14026912,60f9
OK
|
53. You have now uploaded firmware file to the Module flash storage.
54. Issue the following at command to double check file in the list AT+QFLST=”*”
55. Receive +QFLST: “UFS:dfota1.zip”,14026912. If successful downloaded otherwise use AT+QFDEL=”UFS:*” to delete any partial file loaded and repeat steps 43 to 54 above.
56. Issue the following at command AT+QFOTADL=”/data/ufs/dfota1.zip” to initiate firmware update from module flash.
57. Update progress will start.
58. Update progress can be seen on Router logs (see below).
| 10.188.232.13 – Tera Term VT |
| File Edit Setup Control Window Help |
| Mar 23 12:32:55 QUARTZ-GOLD local2.info chat[19867]: send (ATE0V1^M)
Mar 23 12:32:55 QUARTZ-GOLD local2.info chat[19867]: expect (OK) Mar 23 12:32:55 QUARTZ-GOLD local2.info chat[19867]: +QIND: “FOTA”,”UPDATING”,92^M^M Mar 23 12:32:55 QUARTZ-GOLD local2.info chat[19867]: ^M Mar 23 12:32:55 QUARTZ-GOLD local2.info chat[19867]: +++ATH^M Mar 23 12:32:55 QUARTZ-GOLD local2.info chat[19867]: ATE0V1^M Mar 23 12:32:58 QUARTZ-GOLD local2.info chat[19867]: +QIND: “FOTA”,”UPDATING”,100^M^M Mar 23 12:33:02 QUARTZ-GOLD local2.info chat[19867]: +QIND: “FOTA”,”END”,0^M^M
|
59. FOTA”,”END”,0^M^M indicate that the process is complete and Router firmware update is successful.
Note 3: – If you receive any other number than “0” after “END” contact [email protected] with returned error.
60. Reboot Router.
61. Wait for a reboot cycle to complete.
62. Router now is ready with the latest firmware.
63. You can double check the current firmware by using at command AT+QGMR
| 10.188.232.13 – Tera Term VT |
| File Edit Setup Control Window Help |
|
AT+QGMR
EC25EUXGAR08A17M1G_20.200.20.200.
OK |
Note: During remote firmware update make sure the SIM card has enough cellular data to avoid connection loss during uploading firmware package from the local PC to the module of the remote Router.
If you encounter any problem during firmware update or following this guide, please contact [email protected]
Additional Reading
| Description | Author |
AT Command over Internet Protocol Router Guide
|
Siretta |
| QUARTZ-GOLD-5G Global Software Manual | Siretta |
| Router Quick Start Guide | Siretta |
| Siretta Products IP Addresses Explained Application Note
|
Siretta |
