Introduction
MQTT stands for Message Queuing Telemetry Transport. It is a simple lightweight protocol for transmitting and receiving data in IoT devices and uses very low power, low data rate and is easy to deploy.
The purpose of connecting a Siretta Modem through an MQTT broker using MQTT protocol is to enable reliable and efficient communication between different devices and systems in a distributed network or IoT environment where network bandwidth and system resources are limited, devices have limited processing power and where connectivity in the network can be unreliable. As a result, it is ideal for IoT devices that require very low power and have limited resources and are often connected through cellular networks or other low bandwidth connections.
Some of the benefits of connecting a Siretta Modem to an MQTT broker include the following:
- Asynchronous communication: Devices can send and receive messages asynchronously without waiting for a response. This can conserve network resources, reduce latency of the system and make the system more responsive.
- Decentralised architecture: The devices do not need to be aware of each other’s existence and they don’t need to have knowledge of the network topology. The broker takes care of routing the messages to their destination and does not rely on a central server such that the system is more resilient to failures and more scalable such that the broker can handle multiple connections and messages simultaneously.
- Reliability: MQTT includes mechanisms that provide reliable messages with delivery guarantees , even in the presence of poor network connectivity or where devices may be temporarily offline.
- Publish/Subscribe model: MQTT uses a publish/subscribe messaging model allowing publishers to send messages to topics and subscribers to receive messages from topics they have subscribed to.
- Security: MQTT can support secure communication with encryption and authentication mechanisms providing a secure and reliable means of transmitting data, which is essential in many applications where sensitive or confidential data is being transmitted.
For details of using MQTT without SSL please refer to the application note: https://www.siretta.com/2023/05/how-to-connect-a-siretta-modem-to-an-mqtt-broker-without-ssl-certificate/
Connecting a Siretta Modem to an MQTT server using SSL (Secure Sockets Layer) is important where sensitive information is being transmitted and this provides an additional layer of security to protect against unauthorized access and ensure confidentiality, integrity, and authenticity of the transmitted data. Here are some reasons why you may wish to connect to an MQTT server using SSL:
- Encryption: SSL uses cryptographic algorithms to encrypt the data making it unreadable to anyone except the intended recipient.
- Authentication of the Server: SSL certificates provide a way to verify the identity of the server and ensure the client is communicating with the correct server. This helps prevent man-in-the-middle attacks where a third party could intercept and modify the communication.
- Authentication of the Client: This ensures only authorized clients can access the server.
- Compliance with security standards: Many industries and applications require compliance with security standards such as GDPR, HIPAA and using SSL with MQTT can help ensure compliance.
This application note covers how to connect a Siretta Modem to an MQTT Broker using SSL/TLS certificate.
SSL/TLS enables an encrypted connection between an MQTT Broker and a Siretta Modem using a secure socket connection for secure data transmissions.
An application note “How to Connect a Siretta Modem to an MQTT Broker without SSL Certificate” is to be referred to beforehand and throughout this guide. It can be downloaded from the following link: https://www.siretta.com/2023/05/how-to-connect-a-siretta-modem-to-an-mqtt-broker-without-ssl-certificate/. It is a vital document for this Guide.
Requirements
- ZETA-NLP-LTE1 (EU) – https://www.siretta.com/products/industrial-modems/lte-cat-4-mobile-network/ultra-low-power-lte-cat-1-eu/
- Application note “How to Connect a Siretta Modem to an MQTT Broker without SSL Certificate” https://www.siretta.com/2023/05/how-to-connect-a-siretta-modem-to-an-mqtt-broker-without-ssl-certificate/
- Broker URL: https://mqtt.siretta.com/
- Broker SSL/TLS Port: 8883
- Authentication required to connect with this Broker (Username siretta/Password s1r3tt4).
Note (For this guide the following free MQTT broker was used https://mqtt.siretta.com/ ) ,users have to source their own MQTT Broker suitable for their application or may use this test one for testing purposes subject to its availability.
- Certificate Authority: In PEM format.
- All requirements from “How to Connect a Siretta Modem to an MQTT Broker without SSL Certificate.”
Steps.
Obtaining SSL/TLS certificate
1. Open MQTT Broker URL https://www.emqx.com/en/mqtt/public-mqtt5-broker using Mozilla Firefox browser.
2. Click a security icon, circled red (See below).
![]()
3. You will be presented with a screenshot like one below.
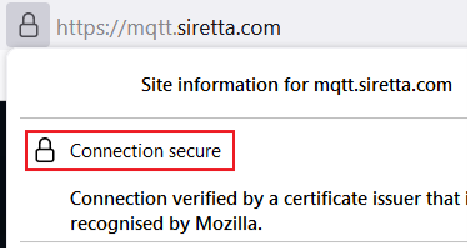
4. Click “Connection secure” option above.
5. You will be presented with a screenshot like one below.
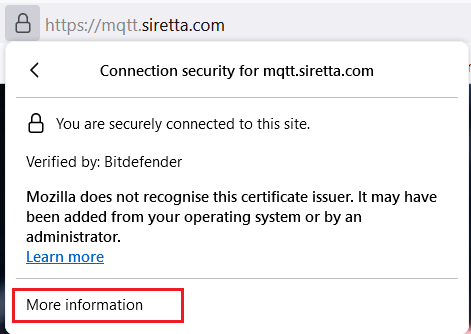
6. Click “More information” tab, you will be presented with a screenshot like the one below.

7. Click “View Certificate” tab (in Red Rectangle), you will be presented with a screenshot like the one below.
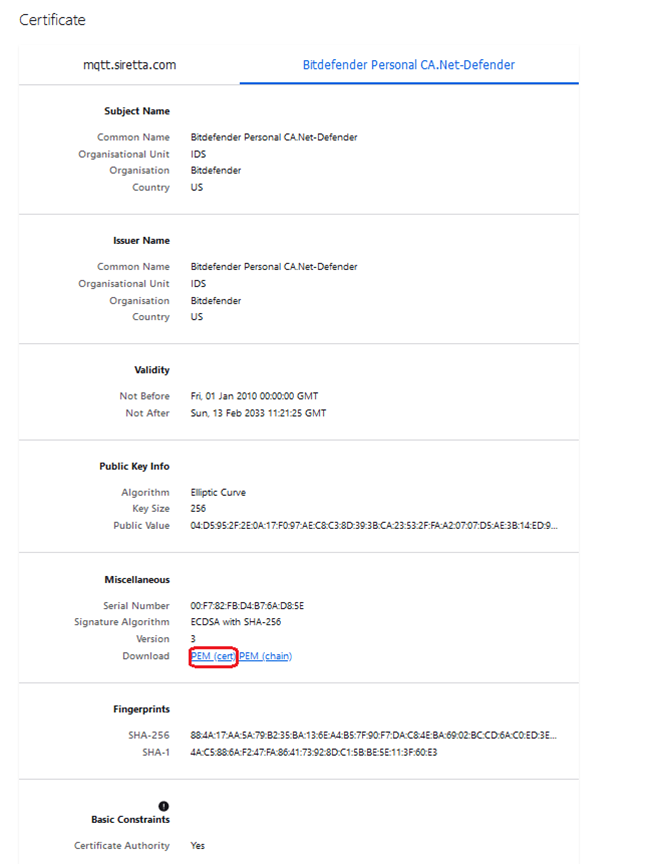
8. Click PEM (Cert) Circled red above to download SSL certificate in a PEM format.
9. Waits for the download to complete.
10. Check the download folder on your PC to confirm that the certificate is successfully downloaded.
11. If successful, you will see the file like one below.
![]()
12. Right click the file to obtain its exact size in bytes. (See below).
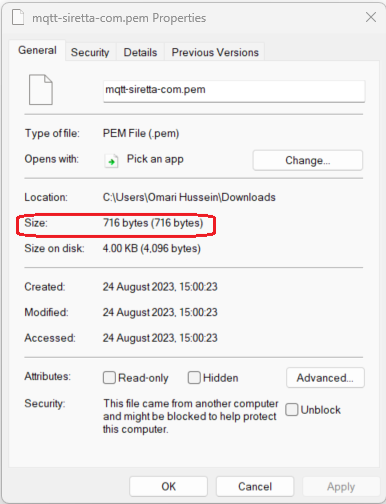
13. Note down the size of PEM file in bytes (for this guide is 716 as circled red above).
Note: You have successfully downloaded a certificate in a PEM format, if you already have a certificate in a PEM format then you can skip step 1 to 13 and continue with step 14 below.
Modem Setting.
14. Follow step 1 to 30 of the “How to Connect a Siretta Modem to an MQTT Broker without SSL Certificate” application note.
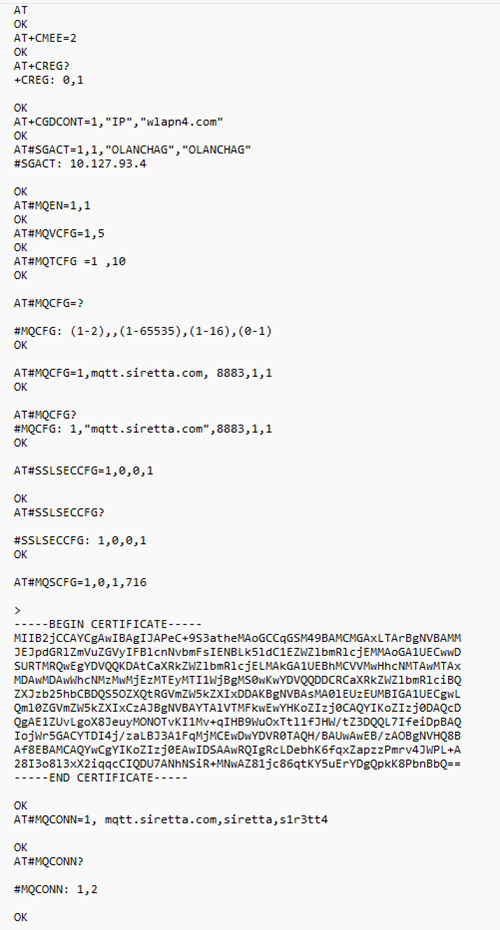
15. Issue AT command.
AT#MQCFG=<Instance_number>, <host_name>, <port>, <cid>, <ssl_en>
Where: –
- Instance_number is 1 for this setting.
- Host name is the URL of the MQTT broker (For this guide the following URL was used mqtt.siretta.com)
- Port is the MQTT Broker SSL/TLS Port number (For this guide 8883 was used).
- cid is the PDP context to be used (For this guide 1 was used).
- Ssl_en is to enable or disable SSL use 0 to disable SSL or 1 to enable SSL. (For this guide 1 was used).
Note: The MQTT broker URL and Port used above is available for free for testing MQTT clients from the following link https://mqtt.siretta.com/. The user may have to source their own MQTT broker.
16. Issue AT command AT#MQCFG=1, mqtt.siretta.com,8883,1,1 to set the MQTT broker details and enable SSL.

17. Receive OK when successful.
18. Issue AT command. AT#MQCFG? to confirm MQTT Broker details and SSL state.

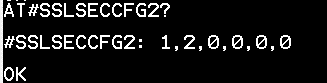
19. Issue the following AT command to check and configure additional parameter of SSL connection.
AT#SSLSECCFG2=?
20. You will receive the results in format below when successful.
#SSLSECCFG2=<SSId>, <version> [, <unused_A>[, <unused_B> [,<unuse
d_C>[, <unused_D>]]]]

where: –
- SSId is the secure Socket identifier which is 1
Note: – The current firmware only supports one secure Socket connection at a time. - Version is SSL/TLS Protocol version.
- Below is the list of supported versions.
0 – Option is protocol version TLSv1.0
1 – Option is protocol version TLSv1.1
2 – Option is protocol version TLSv1.2 - Unused A, B, C and D, reserved for future use.
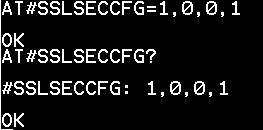
21. Issue the following at command to check the current configuration.
AT#SSLSECCFG2?
22. Receive below when successful.
23. Leave a default version of 2 (protocol version TLSv1.2.) for the purpose of this guide.
24. Use the following at command to check supported security parameters.
AT#SSLSECCFG=?
25. Receive results in the format below when successful.
#SSLSECCFG= <SSId>, <CipherSuite>, <auth_mode>[,<cert_format>]
Where: –
- SSId is the secure Socket identifier which is 1
- CipherSuite (choose option from below list): –
0 – Cipher Suite is chosen by remote Server [default] 1 – TLS_RSA_WITH_3DES_EDE_CBC_SHA
2 – TLS_RSA_WITH_AES_128_CBC_SHA
3 – TLS_RSA_WITH_AES_128_CBC_SHA256
4 – TLS_RSA_WITH_AES_256_CBC_SHA
5 – TLS_RSA_WITH_AES_256_CBC_SHA256
6 – TLS_DHE_RSA_WITH_AES_128_CBC_SHA
7 – TLS_DHE_RSA_WITH_AES_256_CBC_SHA
8 – TLS_DHE_RSA_WITH_3DES_EDE_CBC_SHA
9 – TLS_DHE_RSA_WITH_AES_128_CBC_SHA256
10 – TLS_DHE_RSA_WITH_AES_256_CBC_SHA256 - auth_mode (Choose option from the list below): –
0 – SSL Verify [default] 1 – Manage server authentication.
2 – Manage server and client authentication if requested by the remote server. - cert_format (Choose option from below list): –
0 – DER format
1 – PEM format (default)

26. Issue the following at command to configure security parameters. AT#SSLSECCFG=1,0,0,1
27. Receive OK when successful.
28. Issue the following at command AT#SSLSECCFG? to confirm security settings.
29. Receive below when successful.
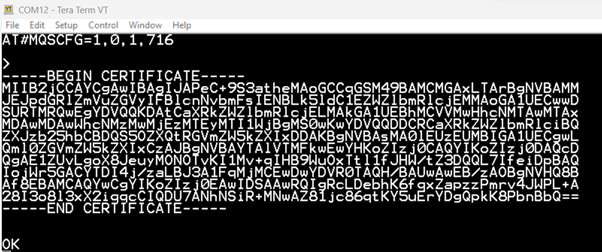
30. Issue an AT command in the format below to configure and store certificate details into the modem NVM.
AT#MQSCFG=<instance_number>, <cert_type>,<set>[,<size>]
Where: –
- instance_number is 1 for this setting.
- cert_type- Certificate type choose from option below: –
0 – for CA certificate
1- for Client cert
2- for Client key - set – choose from two options 1 to set selected and 0 to unselect.
- Size – certificate size in bytes.
31. Issue the following at command to store certificate in a modem.
AT#MQSCFG=1,0,1,716
32. Receive below when successful.

33. Click File option in a Tera Term window.
34. Select send file option.
35. You will be presented with a page like the one below.
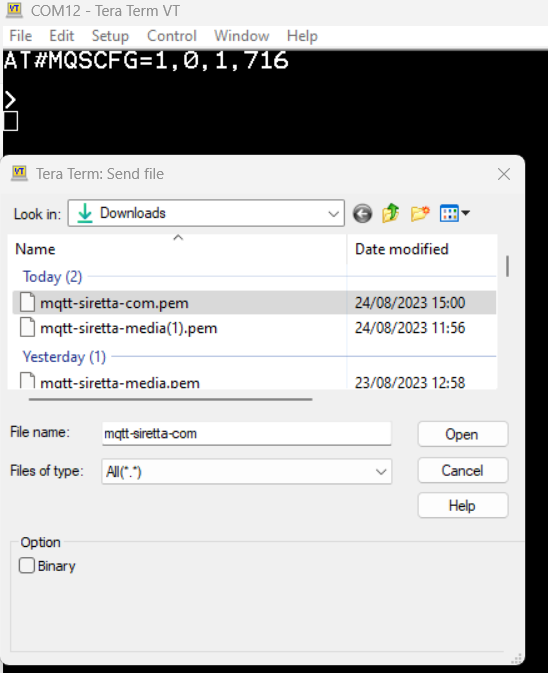
36. Select the certificate file from where it was downloaded /stored in a PC. (For this guide mqtt-siretta-com.pem was used)
37. Click Open.
38. You will see the certificate in a Tera Term window as shown below.
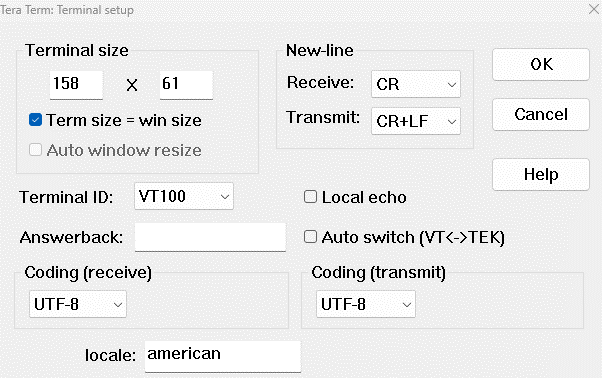
Note: at this stage, set Tera Term to transmit “CR+LF” in a new – line as seen below.
39. Click OK.
40. You will see the beginning to the end of the certificate in a Tera Term window as seen below.
41. Receive OK when successful.
42. Issue the following AT command to connect to the MQTT broker using SSL, username, and password.
AT#MQCONN=1, mqtt. siretta. com,siretta,s1r3tt4
43. Receive OK when successful.
44. Issue the following AT command to check the status of MQTT.
AT#MQCONN?
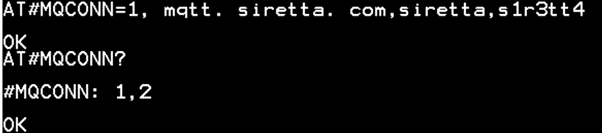
45. You have successfully connected to the MQTT broker using SSL/TLS, username, and password.
Note: Once you are connected to the MQTT Broker using SSL/TLS, you can subscribe to a different topic to receive information from the publisher via a Secured MQTT protocol. You can publish a message which subscribers will be able to view.
Note: The following command AT#MQCONN=1, mqtt. siretta. com, siretta,s1r3tt4 was used because MQTT broker does require an authentication (username /password) with SSL certificate if your selected MQTT broker uses a certificate without authentications then use the following command instead AT#MQCONN=<instance number>, “<ClientID>”
Below is the list of all AT commands used for this guide.
 More information about Siretta’s modems can be found from the following link: https://www.siretta.com/products/industrial-modems/
Note: This application note apply to all Siretta Modems CAT1,CAT4 and CATM.