
Introduction
MQTT stands for Message Queuing Telemetry Transport. It is a simple lightweight protocol for transmitting and receiving data in IoT devices and uses very low power, low data rate and is easy to deploy.
The purpose of connecting a Siretta Modem through an MQTT broker using MQTT protocol is to enable reliable and efficient communication between different devices and systems in a distributed network or IoT environment where network bandwidth and system resources are limited, devices have limited processing power and where connectivity in the network can be unreliable. As a result, it is ideal for IoT devices that require very low power and have limited resources and are often connected through cellular networks or other low bandwidth connections.
Some of the benefits of connecting a Siretta Modem to an MQTT broker include the following:
- Asynchronous communication: Devices can send and receive messages asynchronously without waiting for a response. This can conserve network resources, reduce latency of the system and make the system more responsive.
- Decentralised architecture: The devices do not need to be aware of each other’s existence and they don’t need to have knowledge of the network topology. The broker takes care of routing the messages to their destination and does not rely on a central server such that the system is more resilient to failures and more scalable such that the broker can handle multiple connections and messages simultaneously.
- Reliability: MQTT includes mechanisms that provide reliable messages with delivery guarantees , even in the presence of poor network connectivity or where devices may be temporarily offline.
- Publish/Subscribe model: MQTT uses a publish/subscribe messaging model allowing publishers to send messages to topics and subscribers to receive messages from topics they have subscribed to.
- Security: MQTT can support secure communication with encryption and authentication mechanisms providing a secure and reliable means of transmitting data, which is essential in many applications where sensitive or confidential data is being transmitted.
For details of using MQTT with SSL please refer to the application note https://www.siretta.com/2023/05/how-to-connect-a-siretta-modem-to-an-mqtt-broker-using-ssl-certificate/
This application note is a step by step guide on how to connect a Siretta Modem to an MQTT Broker without SSL. In MQTT protocol “Server” is known as “Broker” and its purpose is to receive a message from the client and send the same message to a subscribed client.
There is no direct communication between clients on MQTT, all communications are via MQTT Broker. The following terms are used in MQTT: –
- Publisher
- Topic
- Retain
- Payload
- Publish
- Quality of Service (QoS)
- Subscribe
Siretta Modems support MQTT protocol and can be a Publisher, a Subscriber or both.
Siretta Modem (MQTT Client). Siretta Modem (MQTT Client).
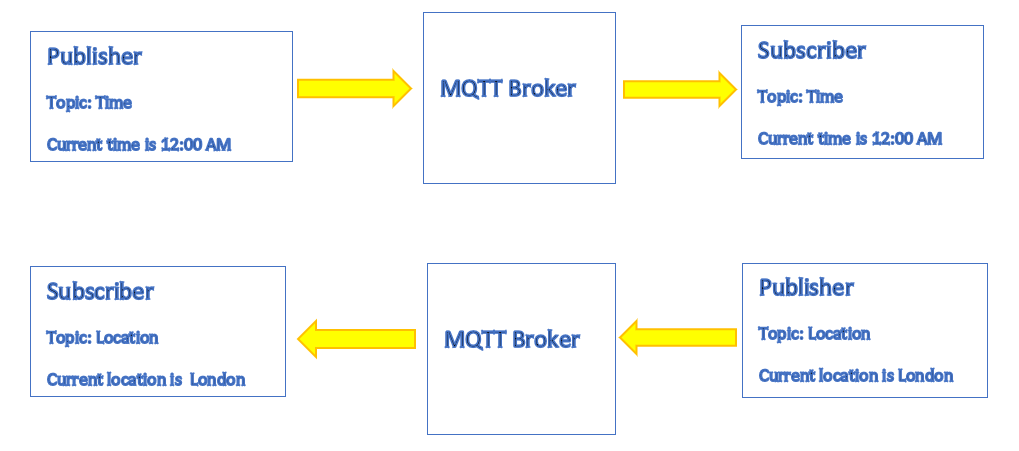
Note: If the Siretta Modem is set for both Publisher and Subscriber on the same topic, the same message will be sent twice, once to the Subscriber and once to the publisher.
Requirements
- ZETA-NLP-LTE1 (EU) – https://www.siretta.com/products/industrial-modems/lte-cat-4-mobile-network/ultra-low-power-lte-cat-1-eu/
- MQTT Broker URL and Port number.
- ZETA-xxP-LTE1 / ZETA-xxP-LTE4 AT Command Reference Manual, it can be downloaded from the following link. https://pages.services/pages.siretta.com/zeta-xxp-lte1-zeta-xxp-lte4-at-command-reference-manual/?ts=1658149511127
- PC with Tera Term Version 4.96 (Tera Term can be downloaded from the following link – Teraterm Link).
Note: SSL certificate for secure connection is not required for this application note.
Steps to connect a Siretta Modem to the MQTT Broker without SSL.
- To power ON the modem follow the Basic Modem Functions and Enhanced Modem Functions application notes.
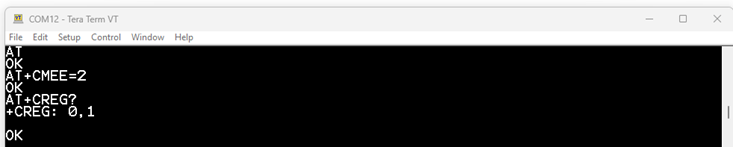
- Issue AT command (AT) to the Modem.
- Receive OK when successful.
- Issue AT command “AT+CMEE=2” to enable verbose Error reporting.
- Receive OK when successful.
- Issue AT command “AT+CREG?” to Check network registration.
- Receive +CREG: 0,1 when registered to a local network. (Or receive +CREG: 0,5 when registered to a roaming network).
Note: If you experience registration problems, please check your SIM card is active and there is signal available for the cellular network in use otherwise contact Siretta support.
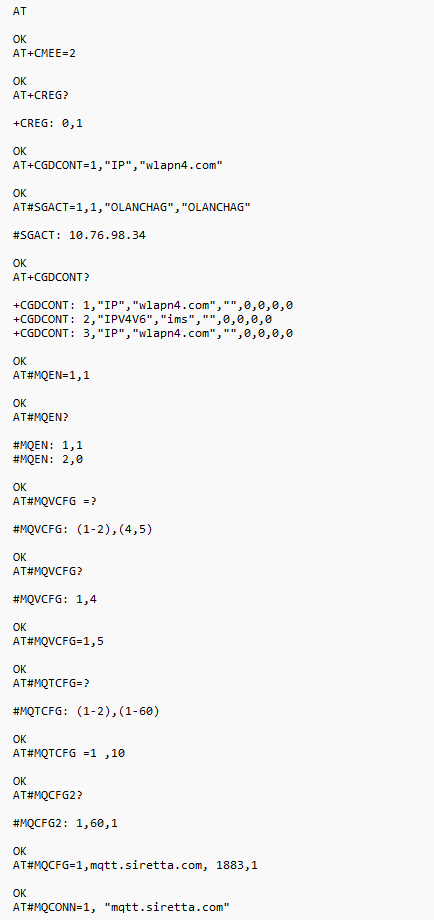
8. After sending the above AT commands, confirm that your Tera Term window looks like the one below.
9. Issue AT command “AT+CGDCONT=1,” IP”,” APN Name”” to set APN details.
Note: APN Name ,user name and password will be provided to you by the mobile operator or Navigate to the following link: https://www.siretta.com/apn. Select the country you are in, Select your Network provider and obtain APN details from the table.
For this guide the APN name “wlapn4.com”, username “OLANCHAG” and Password “OLANCHAG” were used.
10. Activate PDP context by issuing AT command “AT#SGACT=1,1,” APN Username”,” APN Password””
11. Confirm that you are receiving your own assigned IP address and OK when successful as seen below.
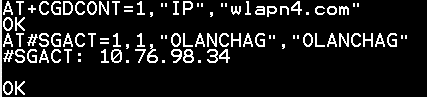
Note: Your assigned IP address may differ from the above depending on your network provider.
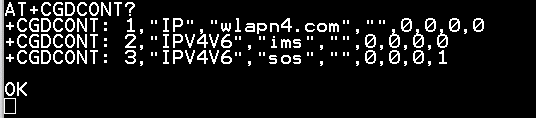
12. Issue AT command AT#MQEN= “Instance number”, “Enable “to enable MQTT Client in Siretta Modem.
Where:
Instance number is 1.
Enable =1 to enable MQTT Client.
Enable =0 to disable MQTT Client.
Instant number is derived from the following AT command AT+CGDCONT? as seen below.
13. Issue AT command AT#MQEN=1,1 to enable MQTT Client.
14. Receive OK when successful.

15. Issue AT command “AT#MQEN?” to check the status of MQTT client.
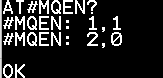
16. You have now enabled the MQTT client.
17. Issue AT command AT#MQVCFG =? to check the supported MQTT version.
18. Receive below response.
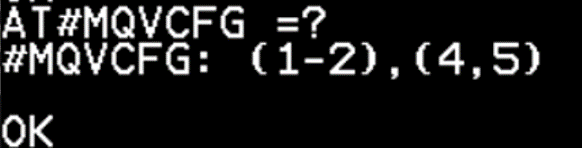
Where:
- (1-2) is instance number.
- (4,5) is the supported version.
- 4 is MQTT version 3.1.1
- 5 is MQTT version 5.0.
Note: MQTT client version is very important as the client version must match with the Broker version. Some MQTT brokers support both versions (3.1.1 and version 5.0).
19. Issue AT command “AT#MQVCFG?” to check the current settings.
20. Receive below when successful.

Note: By default, Siretta Modem is set to 4 which is MQTT client version 3.1.1.
21. Issue AT command AT#MQVCFG=1,5 to set to MQTT V5.
22. Receive OK when successful.
23. Confirm Siretta Modem is set to MQTT V5 by issuing AT command AT#MQVCFG?
24. Receive OK when successful.
![]()
25. Issue AT command to configure packet timeout.
AT#MQTCFG=<instance_number>, <packet_timeout>
Where:
- instance_number =1
- packet_timeout = any number from 1 to 60 (in Seconds)
26. Issue AT#MQTCFG =1 ,10 (to set timeout to 10 Seconds).
27. Receive OK when successful.

28. Issue AT command AT#MQCFG2? to check current additional settings.
29. Receive below when successful.
Note: By default, Siretta Modem uses the above the settings.
Note: If you wish to change additional parameters, issue AT command to set additional MQTT parameters.
AT#MQCFG2=<instance_number>, <keepalive>, <clean_session>
Where: –
- instance_number- choose 1.
- keepalive – Choose from 1 to 3600 (Seconds).
- clean_session – Choose 0 for Persistent session.
- clean_session – Choose 1 for clean session.
30. Leave the default settings of AT#MQCFG2= 1,60,1 (for the purpose of this guide).
31. Issue AT command.
AT#MQCFG=<Instance_number>, <host_name>, <port>, <cid>, <ssl_en>
Where: –
- Instance_number is 1 for this setting.
- Host name is the URL of the MQTT broker (For this guide the following URL was used mqtt.siretta.com)
- Port is TCP port of the MQTT broker (For this guide 1883 was used).
- cid is the PDP context to be used (For this guide 1 was used).
- Ssl_en is to enable or disable SSL use 0 to disable SSL or 1 to enable SSL (For this guide 0 was used).
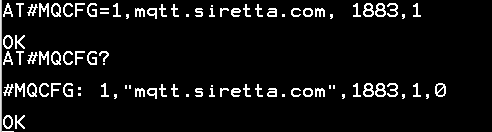
32. Issue AT command AT#MQCFG=1, mqtt.siretta.com,1883,1,0 to set the MQTT broker details.
33. Receive OK when successful.
34. Issue AT command. AT#MQCFG? to confirm MQTT Broker details.
35. Issue AT command AT#MQCONN=1, “mqtt.siretta.com” to connect to the MQTT Broker.
36. Receive OK when connected.
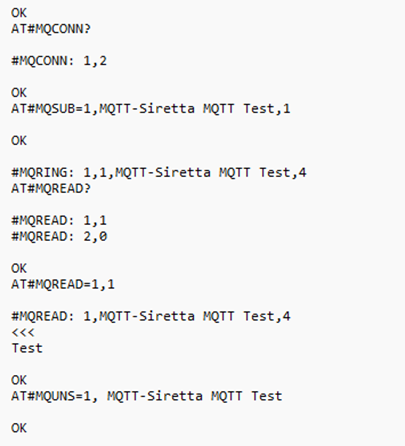
37. Check the status of the connection by issuing AT command AT#MQCONN?
38. Receive the following #MQCONN=<instanceNumber>, <state>
Where:
- Instance Number- 1 for this setting
- State – 0 client is in initialization state.
- State – 1 client is connecting to the MQTT broker.
- State – 2 client is connected to the MQTT broker.
39. Below is the result of AT#MQCONN? For our settings
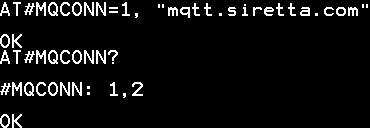
40. You have successfully connected to the MQTT Broker.
Note: Once your connected to the MQTT Broker, you can Subscribe to a different topic to receive information from publisher via MQTT protocol. You can publish messages where subscribers will be able to view.
41. Issue AT command to subscribe to the Topic.
AT#MQSUB=<instance_number>, <topic> [, <qos>]
AT#MQSUB=1, MQTT-Siretta MQTT Test,1
Where:
- Instance_number is 1.
- Topic for this guide “MQTT-Siretta MQTT Test” was used.
- Qos is the quality of service. (Option of 0-2) for this guide 1 was used.
42. Receive OK when successful.
43. When there is new message/data from “MQTT-Siretta MQTT Test”, you will receive indication #MQRING: 1,1, MQTT-Siretta MQTT Test,1.
44. Issue AT command to check message ID AT#MQREAD?
45. Issue AT command AT#MQREAD=1,1 to read.
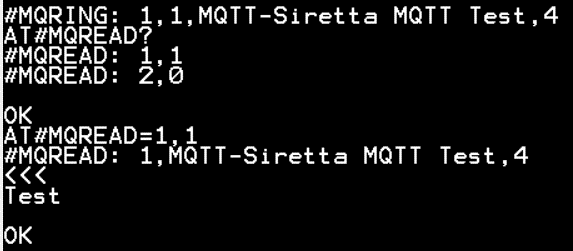
46. You have successfully subscribed to the Topic, received message and read message.
47. To unsubscribe from the Topic issue the following AT command AT#MQUNS=<instance_num, <topic>
AT#MQUNS=1, MQTT-Siretta MQTT Test.
Below is the list of all AT commands used for this guide.
Note: This application note did not cover “How to Connect Siretta Modem to MQTT Broker using SSL Certificate, this will be covered in a separate application note.
Note: This application note apply to all Siretta Modems CAT1,CAT4 and CATM.
